Monday 30 April 2012

1/5/12


Me tacking the top and bottom plates together.
So during our class today,We found out that the house on the wet area side was out by 10mm,We spent 30-45minutes remeasuring to try and find the problem,In the end Mark added up all the measurements to find out that the house plans were wrong on one side.Once this was found,I moved on to making top and bottom plates with my group.

Bedroom one.
Top and bottom plates.
We used the straightest 4x2 timber,(H1.2)treatment,I tacked the top and bottom plates together to keep them in the same postion to get a nice straight edge cut using the radial arm saw.After this was done,I grabbed my Tape and marked down the right measurements for the plates.For the top plate,The bottom can be a little bit rough as it can be nailed down easier to the floor.We cut 45mm,off one end,which is centered in the middle of the internal wall.The next one is then done off the previous,most plates are cut to meet where walls are joined.With bigger rooms the plates will be nail plated together.There were a few minor mistakes with some of our cuts,but they were re done to fit perfectly.

The tools I used today were;Radial Arm Saw,Combination square,Skilsaw,Hammer,Tape,rule,and clamps.

The whole top and bottom plates are all finished and cut to the correct lengths and laid out on the floor.We will be cutting the dwangs for the framing tomorrow.So the framing should be getting marked out and put together.


Starting to come along nicely


Top and bottom plates


Mark finding out that the building plans were wrong by 10mm.

Sunday 29 April 2012

30/4/12

As soon as class started today I was given the task of cutting one of the last boards for the floor,I got a couple of stands out for the board to sit on,then got the skilsaw,Eye protection was worn along with grade 5 ear muffs.5mm needed to be trimmed of the side,so i added 39mm because of the distance between the blade and the guide,and cut it.The cut was accurate,next up it was glued down and nailed with the paslode.Nail punches were used to force the nails deeper into the board.

Me,Brad and Liam were then shown how to mark out the lines for the walls.We used a chalk line to accurately get the lines in the correct place.All the bottom plate lines were marked so the framing is ready to be put together for the walls.things are really coming along quite nicely now.

I then moved onto finishing up my oil stone box.
The tools I used were,chizels,hand plain,hammer,rule,builders square
Finished Box.
Plans for the Oil stone box.


Chizzled sections for the stone to fit in.
I marked the lines on the lid,then used a plain on a slight angle to edge the top of the block into a roof shape.Once it was all even I had then finished the top.The bottom was also finished today,all that was required was to chizel to the marked lines,I then gave it a light sand to smoothen it up.I am happy with the finished product.
Side on view.

Monday 23 April 2012

24/4/12

Today my half of the class were making our oil stone boxes.We were handed 2 blocks of wood,we had to use our chizels and hammers.The Oil stone had to fit into the blocks,13mm in depth on each block,The bottom one is to be tight and the top block is to have a 1mm gap,once the insides have been chizled out,we were to plane the top on a small angle on all four sides.I spent the whole day doing this.

When using the chizels,never chizel towards yourself as you could chizel yourself in the leg.Always aim it away from yourself.I also used a hand plain to clean up the insides of the blocks.Both handles are to be held when using it as you could possibly cut yourself.

The block of wood at the start.
After I have chizled out the insides to squeeze the oil stone in.

Making sure you have sharp chizels is important,after all you want a nice clean tidy job.The sharper the better,also safer.

Sunday 22 April 2012

23/4/12

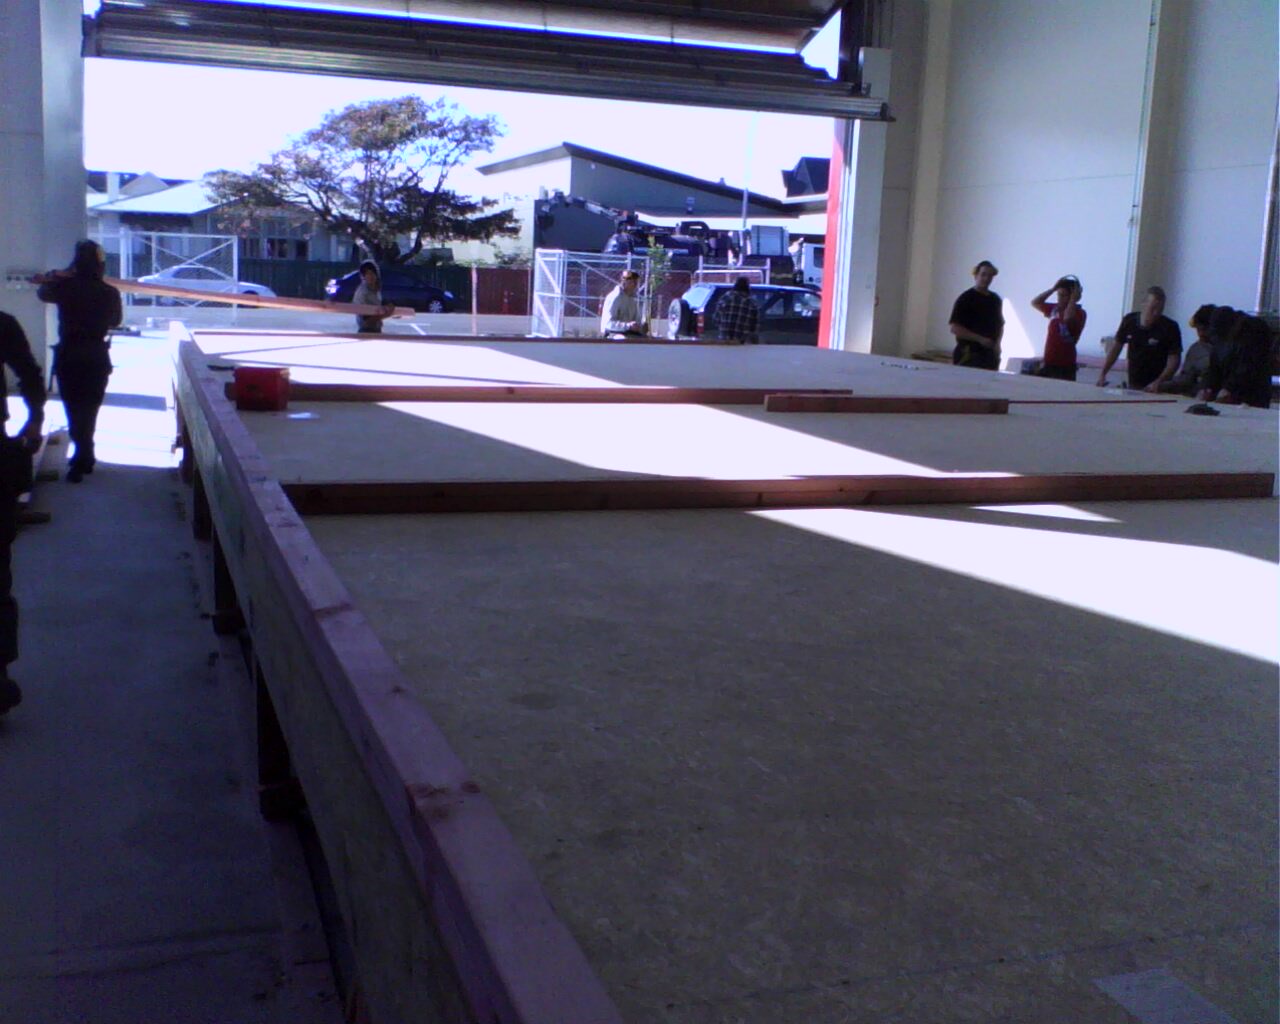
So to start off the day I got involved with the Plywood,We had to work out the correct measurements for it to be placed,Looking at the plans for the likely wet areas of the house,such as bathroom,laundry and toilet,The ply is used because the water does not get obsorbed by the wood,whereas with chipboard it goes all mushy and soft.The joists were glued with gorilla glue,then the plywood was placed down and sledged into place.When it was all flush,a chalk line was used to mark down the joist line underneath.At each end of the floor boards,the air compressed nail gun was used and at every 150mm a nail was put down.The next rows were nailed at 200mm,the nails used were 65mm galvs.Each board was put on the stands and cut with the skillsaw,I added 39mm(The leeway from the blade to the flat metal base,plus the 15mm that needed to come off the boards so they were flush with joists barriers.We had to work out the area of the wet area to see how many ply boards were needed.So 6780mmin length and 2000mm as the width,6.780x2.000mm=15.56m2,each plyboard =2.400mmx1.200mm=2.88m2,15.56m2/2.88m2=5.8,rounded to 6 so 6sheets required for the wet area.

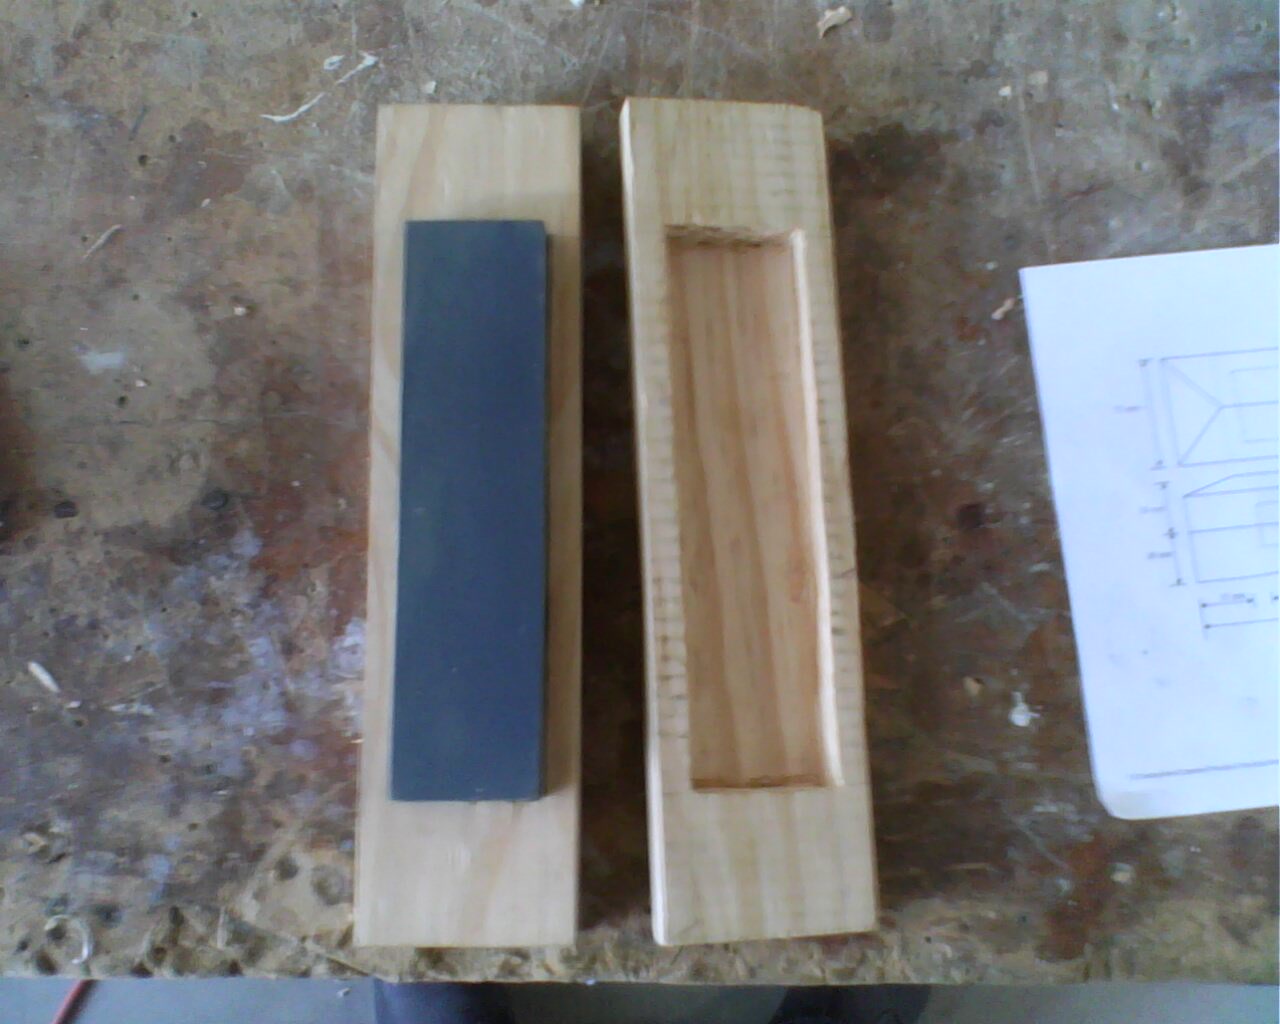
The other half of the class started an exercise with the chizels making a box for the oil stone to be kept in,The bottom is to be super tight and the top,(lid) is to be loose.
Nailing Pattern.

Me putting Gorilla glue down on joists.

Me Cutting plywood for the wet area with skilsaw.
Our working out for the wet floor area.
The glue used,Gorilla Grip Express Glue,Takes an
hour to cure,To clean up the glue before cure,use bulldog cleaner,If the glue is swallowed,never give water,and do not induce vomitting,Seek medical advice,try to avoid getting the glue on your hands as you may have a skin reaction,For more about the medical side of things refer to the packaging or the website,www.holdfast.co.nz.This glue can be used on various materials.

Tuesday 17 April 2012

18/4/12

So this morning our groups were all given individual tasks,2 groups were working on the flooring boards.My group had the Joist exercise,We had to cut 2 bits of 4x2 into 330mm lengths and another 2 into 480mm lengths.I used the radial arm saw to do this.Once this was achieved.Mark issued us with our new stones,we had to wet the stones then leave them in the sun to dry out.After this I was shown how to sharpen my chizzles.Putting the curved edge on the stone and raising it on a 5 degree angle and sharpening it on the stone in a figure of eight motion.The next step was to find the center of the timber and measure 150 on each side,so a total of 300mm.I done a half housing joint and an angle joint,these had to be tight,otherwise they were to be redone,I had to re do so many times to get it right.Finally I got there.

Joist join.
Using my chizel for the first time.


2nd part of the joist exercise using chizels.
After finishing the joist exercise,I moved on to helping out with the flooring.Gorilla Glue,We had 30minutes to place the flooring board down before it started to cure,Once the board is done,it takes approxamately 2hrs to cure once layed down into position.The glue is applied to the Joists with a Glue gun,the glue comes out in a paste.The boards are then nailed down with the air compressed nail gun,with galv 75mm nails,these nails are used because it is subflooring and moisture lurks under housing so these nails will not rust.Every 150mm nails were driven in to give it that extra strength.Chalked stringlines were put down so we knew where the joists were under the flooring for the nails.The boards were hit with a sledge hammer to get them flush.We will finish the flooring next week.

Monday 16 April 2012

17/4/12

Setting up Dodge and Block with string line to see if the Joist boundary is straight.
So today I carried on with routering,A new template was made so I could cut out a square on the barrier joists for the nail plates.When the nail plates are put in they are nice and flush with the wood,gives it a tidy clean finish.All bearers were completed.Dodge and block were set up on top of the joists again,some of the bearers needed to be packed.After this was done and level,the joists were nailed down with 4 inch galv nails by the nail gun.Me and Tom marked out the next set of blocking for the waldrobe.Me and Brad checked the measurements between each joist.450mm,in and over.The flooring is ready to be put down tomorrow.
Curtailed joists.
Trimming Joists.
Joists in place.


Here are some diagrams of how joists are fixed,to the bearer support.


The joist barriers were nail plated together on top of the bearers

Sunday 15 April 2012

16/4/12

-Gear Used;Router,Clamps,Nail gun,Radial Arm Saw.

Brand New tool kit!
So today we continued with the build after our week break,My group got the task of nailling in support blocks under the framing blocks inbetween the joists,the blocks were 442mm long two of the corners were cut so we could get them on the inside of the joists.Once these were installed,we headed out for smoko,when we returned.We were all given our tools,I set up my chalk line ect then moved on to using the router.I used the router to cut out like a 3mm-5mm chunk for the nail plate where the bearers are to be connected.I used a guide/Stencil that me and Brad made,so error could not occur.I wore ear and eye protection whilst using the power tool

.Also the stencil was clamped to the bearer.Once these were done nail plates were nailed in,3 nails on each side of the plate to give it that strength to hold.The string line and dodge and block were set up to check how accurate the joist barriers were.Brendon used the sledge to knock the joist barrier back into place.The next task will be to strap the Joists in place.Then on with the flooring.

Tuesday 3 April 2012

4/4/12

Today we nailed the last of the piles down,We re-checked the spot levels on the sole plates and they were level.After that we installed the bearer to the top of the piles.Bracing was nailed to the piles so we could get the bearer level.A string line was put on the side with a block of 4x2 at each end and run another block down the line.Once these were all leveled,the barrier joists were nailed on.Our diagonals were out by 5mm so Matt and Cam Hit the bearers and got them to 17.091 making the bearers all square.We then started cutting up the joists,so 45mm at each end taken away so (90mm in total) from 7200 making the joists lengths 7110.To get the amount of joists needed,15500 length of the building divide by 450mm=34.4,rounded up to 35 and another one added for the one for nothing,so 36 in total.We managed to get all the joists cut to the correct lengths and tacked in place.Me and Brad started installing the blocks for the walling.The blocks width are 140mm,and we were to have them centered at 600mm,670 for the first measurement then used the running measurement to carry on,670,1270,1870 and so on.
Joists being put in place.
Joists all in place,along with blocks.
Our results for the day.

The blocks were made up for the potential manhole,The joists were cut and a square structure was nailed in.Next time we are back at tech we will be strapping the joists into place making the structure stronger.

Blocks for walling being installed.
The powertools I used today were;Nailgun and Radial arm saw.

Bearers being shaved then Joists being installed.
Before using the radial arm saw I checked around for potential hazards,such as off cuts,nails,anything that could get in the way whilst using the saw.I wore eye and hearing protection.I also never leave the saw untill it stops spinning,that    
way I know it cannot harm anyone.


When using the nail gun,I wore ear muffs and nailed into strong bits of timber,not to close to the edge causing the nails to fly out.I also made sure nobody had their hands in the way.

Monday 2 April 2012

3/4/12

Started with Maths today,Started with working out the area of foundations and the volume.For example,We used our Build measurements,7.200x15.500x.125(being the depth)=13.95m3,Thats the volume,The area is 15.500x7.200=111.600m2.Mark also showed us how to work out the required amount of joists we needed.Yet again we related this exercise to the build,So 15.500 divide by 450mm,(450mm being the distance between each joist.)which = 34.4,round up to 35,then add one more for the one for nothing making it 36 joists required.We then moved on to the working out of center of bearers,which is 7.200-.100=7.100,then 7.100 divide by 3 = 2.367mm,The next important thing I learnt was to calculate how many boards for the floor,To do this we need to calculate the area of the house,in this case,7.200 x 15.500=111.6m2,next up we need to get the area of the sheets of flooring we are using,the sheets are 3.6m x 1.2m=4.32m2,now all we do is divide the area of the house by the area of the sheet,111.6m2divide 4.32m2 =25.8 sheets,round to 26.so 26 sheets of partical board is needed.
(Flooring)To work out the amount of particle board needed.

After our maths session we switched around and went back to the build.Bracing was installed today to ensure our bearers we level.The first bearer we done,was taken down and new piles were cut in the correct lengths.This was after I used the builders level to gain the spot levels at each point.

Sunday 1 April 2012

2/4/12

Me having a jam on the nail gun,installing piles.
Today we resumed the build,The rest of the piles were cut to size and installed to the sole plates.We then went to the eshed and discussed what was going to happen with the bearers,We grabbed 140X45 H3.2 timber and lined them up on the piles,With the over hang of the timber we cut,they were cut so they matched up halfway on the pile so we could join the other bearers on the pile to hold the strength.Once they were flush at each end we flipped them over and drew a 25mm deep line at the top and bottom on the bearer,then measured in 300mm increments and ruled a line for where the nails are to be placed.Then the bearers were all clamped and kept tight.

Me cutting up 4x2 for piles using the Radial arm saw.
Next up was the nails,We nailed the nails in on angles,one nail going in one way and another going in the other.This is to stop the bearers from falling apart when the house is moved.I started cutting up 4X2 for the bracing of the piles which will be hammered in place tomorrow.We also got split up and sent to the class to learn how to do the "Overall,Individual and Running measurements along with getting the center of a stud ".For the Top and Bottom plates.I also learnt about studs and dwangs.We were also shown by Mark how a water level is used.He grabbed a bottle,drilled a hole in the bottom and attached a 20 metre hose
to it and filled it with water.We then marked a line on the wall and transfered it to a table leg on the other side of the room,it was level.So I found that interesting and cool for something so basic.I also used a nail gun today,To nail the bearer to the piles,put pressure on the safety tooth and angled it upwards then pulled the trigger.Really easy tool to use and really effective.

Water Level
Here's a picture of a homemade Water level,worked like a charm.

A 20 metre hose was used,A drill was also used to do the hole in the bottom of the bottle.Water was then put in and we marked a line on the wall,then run the hose to the other side of the room and marked another line,We had them dead accurate,There must be no bubbles in the water or no small holes in the tubing as this can effect the results.This is a cheap and effective way to get things at the right height,especially over long distances.If these are being used outdoors during winter then anti freeze can be added to prevent it from freezing up.Dye can also be used to make it easier to see.